Monday, June 18, 2012

Happy Father's Day!

Even though I am a day late, I hope all the dads out there enjoyed their Father's day! For holidays such as these, I often bake my dad's and my future father-in-law's favorite cookies to supplement their gifts. I even do it for birthdays or Easter. Desserts are a great way to say you've been thinking about someone and homemade treats say you took the time to create something they love.

Both my dad and Greg love my signature oatmeal cookies: Oatmeal Lace Cookies. I've made them for several years now and even mentioned them in one of my podcasts I did on healthy cookies. Yep! HEALTHY cookies. This amazing recipe is actually a Weight Watchers Recipe! For those of you following the program, two cookies are three points. It's also very easy; I just need a bowl and a spoon. My mixer doesn't have to get dirty for this!


Oatmeal Pecan and Lace Cookies, Weight Watcher Website

1 ¼ cup(s) rolled oats
½ cup(s) dark brown sugar, packed
1 tsp baking powder
½ cup chopped pecans, finely chopped (or walnuts, or almonds, or whatever nut you choose)
1/8 tsp table salt
1/3 cup(s) regular butter, melted
1 large egg, beaten
½ tsp vanilla extract


1.     Preheat oven to 350 F and cover 2 cookies sheets with parchment paper or foil. I don't have parchment paper and, therefore, use foil for everything. I would suggest spraying the foil with a nonstick spray; the first time I made these I didn't spray and they were GLUED to the paper and fell apart. No matter what you use, spray!!
2.     Chop the pecans or walnuts. To do this, I simply put them in a plastic bag and go to town with a rolling pin. I always use walnuts for this recipe because I always have them on hand. This recipe works well with walnuts and pecans, no matter what you choose. You can even do them both--this will alter the points value though. Then, mix oats, sugar, baking powder, pecans and salt together in a large bowl until well incorporated.


3.     Add butter, egg and vanilla to oat mixture; mix well. As you can see in the picture below, the mixture just looks wet and does not seem to stick together very well. Just make sure you get it as wet as you can as you mix it up.

4.     Slide teaspoonfuls of batter onto prepared cookie sheets and flatten each out, leaving at least 2 inches between each cookie. Yes; I mean SLIDE. Scoop up the batter with the spoon and slowly push it onto the cookie sheet. Make sure they aren't in a ball form; you want them to be flatter so they come out like "lace."

5.     Bake cookies until edges turn golden, about 8 to 12 minutes. Let cookies stand on cookie sheets for 2 minutes before removing to cooling rack.


    There is not much of a physical difference between when you put the cookies in the oven and when you pull them out. However, the bottoms get golden brown and look like crystalized sugar, as you can see in the bottom photo. A word of caution: don't get discouraged if they fall to pieces on you. It took me quite a few times of making these to keep them whole and prevent them from falling apart. However, they are nutty, vanilla-y, and full of flavor, which makes them great to eat as a cookie or to eat in pieces in a bowl of milk or cereal to act as granola. 

   The best part? They are Weight Watchers approved! Two cookies for three points? Most of the time you cannot touch one cookie for under four. These are sweet and fulfilling--definitely guilty free. The best part? Making them for your dad is not going to hurt his diet. It's giving him a healthy alternative that he will love and completely enjoy. Just see how long those cookies last. :D

Friday, June 8, 2012

Toffee Crunch Muffins. . . Without the Toffee!

Remember one of my first posts about the yummy Toffee Crunch Muffins?


Instead of making this EXACT recipe, I decided to make dinner muffins out of them instead!

Regular Muffins from Kitchen Aid Baking Basics:
Ingredients:
1 1/2 cups all purpose flour
1/3 cup packed brown sugar
2 teaspoons baking powder
1/2 teaspoon baking soda
1/2 teaspoon salt
1/2 cup milk
1/2 cup sour cream
1 egg, beaten
3 tablespoons butter, melted
1 teaspoon vanilla

Directions
1. Preheat oven to 350 . Grease 10 standard muffin cups (I think I made mine smaller because I used 18 muffin cups).
2. Combine flour, sugar, baking powder, baking soda, and slat in bowl of electric stand mixer. Combine milk, sour cream, egg, butter and vanilla in small bowl until well blended. Stir into flour mixture until moistened. Spoon batter into prepared muffin cups. 
3. Bake for about 20 minutes or until toothpick comes out smooth (I had to bake mine for 25 minutes, but start with less time and then go up). Remove from pans; cool on wire racks 10 minutes. 


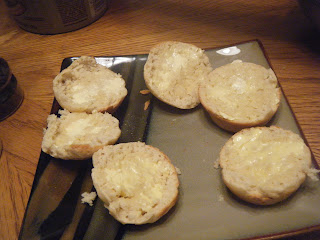
All I did was omit the toffee! They remained a little sweeter because of the milk, brown sugar and vanilla, but were really great fresh out of the oven with the beef stew I made on a stormy night. I also reheated them a few nights later in the oven, and they tasted the same as the first night! Keith likes to eat them with butter, but I personally like them plain. Either way, they are a perfect carb for dinner or breakfast!


Sunday, June 3, 2012

Peanut Butter Banana Muffins

When my mom and I go to doctors appointments, we often sit in the waiting room and read their piles of magazines looking for tasty recipes to try. If we happen to find something appealing that catches our eyes, we quickly flick them around the room and quietly peel the recipe out to slip in our pockets. Not the best method but an effective one I have perfected over the years.

Today's blog features a recipe I found this shady way: peanut butter banana muffins. Now, if you are not a fan of peanut butter OR bananas, then you are out of luck today, my friend. However, I happen to enjoy both greatly, as does almost everyone in my family--especially my dad. I made them with him in mind and brought them to him this past weekend. I am waiting for his opinion on them. But this recipe was especially appealing to me because I had bananas that skipped the "firm" stage and went straight to "gross."
Nasty, right?


Banana and Peanut Butter Muffins
2 1/3 cups all purpose flour
1 ½ tsp baking powder
1 tsp baking soda
¼ tsp salt
1/3 cup Country Crock spread
¼ cup peanut butter
½ cup sugar
2 large eggs
1 cup milk
2 ripe bananas, mashed

1.     Preheat oven to 400. Grease two 12 cup muffin tins or line.
2.     Combine flour, baking powder, baking soda and salt in medium bowl; set aside.

  • Beat Country Crock spread with peanut butter in large bowl with mixer until smooth. Add sugar and beat until light and fluffy, about 3 minutes. Beat in eggs. Alternatively beat in flour mixture and milk combined with bananas with mixer on low speed until blended.


Spoon into prepared pan to make 18 muffins.

5.     Bake 20 minutes. Cool 10 minutes.


    As you can see, I actually got 24 muffins instead of 18. I prefer my muffins a little smaller so I can eat more of them. :D Here's the final product:


I know--my camera takes awful photos. Sorry! Not a photography major. Anyways, these muffins came out very light inside and fluffy too.

However. . .

I forgot the salt. 

I know, I know. This is the first time I have EVER forgotten an ingredient, but I'm not sure if missing the 1/4 of a teaspoon really mattered too much. It might have helped a little bit, but these muffins were just really bland. REALLY bland, and to have some salt in there would have been beneficial. However, I think part of my problem too was that I kept expecting them to taste like my banana bread recipe, which they definitely do not. 

If you are craving muffins, I'm not sure I would recommend this recipe to you. Now, my dad really likes foods that are more "bland" than most people (he would disagree). If you fall into this category, they might be for you. All I know is that I ate half of one, and I was a disappointed in the results.

On the other hand--these make great dog treats! Apollo was having bathroom problems outside, but refuses to eat rice or even regular banana anymore. He is just too spoiled for his own good. Instead, I have him pieces of these to eat, and he gobbled them right up--he's definitely my boy because he loves his carbs. After he had a whole one, he would not leave me alone for more. I have broken up pieces to freeze and keep around as treats for him when his tummy gets upset. It is not enough peanut butter to hurt him, and he loves it anyways. Plus, it has banana, which will help his tummy. 

If any of you are inspired by peanut butter banana recipes and find a great one that you love, please share it with me! I need something to replace this one! Thanks!

I guess this is karma for stealing the recipe out of a magazine, huh?

Monday, May 28, 2012

Cornbread Escapades

Happy Memorial Day, everyone!

This past weekend, my two best friends and I had a sleepover. They came over Friday around dinnertime, and instead of going out, Christy and I made dinner to repay Caitlyn for the time she made it for us. Our plan was quite simple: chicken, and corn. However, seeing as the three of us LOVE bread more than almost anything else, our dinner plans were not yet complete without something heavenly and full of carbs. Christy and I had the perfect solution:

Cornbread.

After looking online, we were torn between two cornbread recipes. What were we to do but make both of them and see what we liked better!

We decided on two recipes: Yogurt Cornbread and Buttery Cornbread.


Yogurt Cornbread:

1 ½ cups cornmeal
1 cup all purpose flour
3 teaspoons baking powder
½ teaspoon salt
½ teaspoon baking soda
1 cup plain yogurt
2 tablespoons melted butter
¼ cup maple syrup or honey (we opted for honey)
3 large eggs.

1.     Heat oven to 375F. Grease and flour a 9 inch round baking pan.
2.     In a large bowl, combine the meal, flour, baking powder, soda, and salt.
3.     In another bowl, whisk together the yogurt, butter, honey, and eggs. Combine the two  mixtures and stir until blended. Spread the batter in the prepared baking pan.
4.     Bake for 25 minutes or until firm and lightly browned.

  As much as this sounds like it would be a moist bread with the yogurt and the honey, this was the drier of the two:


As you can see, the bread is quite dry--which is how cornbread is actually supposed to be. However, it was not as sweet as we had hoped, even though we used honey. It did turn out to be this gorgeous honey color, but it did not taste like we had hoped. If I were to make this again, I would probably double the honey it asks for, but I'm not sure I'll be using this recipe again because it did not make it as leftovers! I brought it to my mom's for a party after wrapping it up to keep it, but my dad said, "I haven't eaten anything this dry since sand." And he was right! Just that 24 hours made all the difference in the world and it basically turned into sand paper. =/ I like recipes I can eat and enjoy multiple days in a row, which was not the case with this cornbread.

However, the second recipe turned out to be fabulous:

Buttery Corn Bread
2/3 cup butter or margarine, softened
1 cup sugar
3 eggs
1 2/3 cups milk
2 1/3 cups all purpose flour
1 cup cornmeal
4 ½ teaspoons baking powder
1 teaspoon salt.

1.     In a mixing bowl, cream butter and sugar.
2.     Combine the eggs and milk separately.
3.     Combine the flour, cornmeal, baking powder and salt separately.
4.     Add these to the creamed mixture alternately with egg mixture.
5.     Pour into a greased 12 in x 9 in baking pan. Bake at 400 F for 22-27 minutes.


I could barely get any photos of this because we all devoured it! It came out very fluffy and soft, and actually very moist! This would be a great recipe for anyone who is interested in moist cornbread. I have added this recipe to my recipe box and will most definitely make it again. I tried it 24 hours later to see how it kept and it was just as moist as the night before. :D We were very pleased.

And satisfied. It was like slipping into a cornbread coma :D


Sunday, May 20, 2012

Podcast!

Happy Sunday, everyone! I am, unfortunately, sick again. Not sure how it happened. But it did. :/ However, because I am sick, my baking has been paused for the week. It never makes much sense to make to make something when I'm ill because of all the germs.

Instead, I thought I'd share my baking podcast I recorded. It has a few segments: kitchen gadgets, a healthy segment and a recipe to supplement the healthy discussion. Please give it a listen if you choose; if you like it, let me know! My professor said I should consider posting my own podcasts and keeping up with them weekly. Let me know your opinions. Thanks!

Podcast!


Sunday, May 13, 2012

Happy Mother's Day!

Happy Mother's Day to all the fabulous moms who read my blog! And to all of those who do not, I am still thinking of you :D

Before I share what I made for Mother's Day, I have short story to share with all of you: last year, our best friends' baby was due on Mother's Day weekend. Their son's birthday was actually Mother's Day last year (May 7th). Anyway, we watched their daughter for them while they were busy at the hospital. Keith's parents were coming over for dinner, and Daisy (name changed to protect identity) and I decided it would be fun to bake something for them to celebrate. She helped me make my famous Snickerdoodles.

THIS year, my girlfriend came over to work on a project we had due for our seminar class. We finished it much earlier than we anticipated, so I asked her to help me make my Mother's Day treat to split up among Keith's mom and my family. So, on that day, May 8th, she and I made my famous Snickerdoodles.

That's right, folks. I made them two years in a row for Mother's Day, and I did not even do it intentionally. I didn't even realize it until after she and I had them in the oven. I had wanted to bake them anyway, but she had never had them before and wanted to try them. Christy is an avid baker herself and could not help but drool over the smell and the crispiness that came out of the oven:


Now, I am a firm believer that TRUE Snickerdoodle cookies have cream of tartar in them. However, if you do not have cream of tartar (the only reason I do is for this recipe), substitute baking powder for BOTH cream of tartar and baking soda. When baking soda and cream of tartar are mixed together, they basically create baking powder. I've been told this does not necessarily do anything to the taste of the cookie, but I'm not really sure about that. Snickerdoodles have a distinct sweet and cinnamon-y flavor to them that sugar cookies and shortbread cookies do not imitate. My recipe is below:

Snickerdoodles

1 ½ cups sugar
½ cup butter softened
½ cup shortening
2 eggs
2 teaspoons vanilla extract
2 ¾ cups all-purpose flour
2 teaspoons cream of tartar
1 teaspoon baking soda
¼ teaspoon salt
¼ cup sugar
2 teaspoons ground cinnamon

1.     Heat oven to 400 F.
2.     Cream together 1 ½ cups sugar, butter, shortening, eggs and vanilla in large bowl. Blend in flour, cream of tartar, baking soda and salt
3.     Shape dough into balls. Mix ¼ cup sugar and the cinnamon. Roll balls in cinnamon-sugar mixture. Place 2 inches apart on ungreased cookie sheet.
4.     Baking 8 to 10 minutes or until set. Remove to wire rack.

*Modifications: less butter; 2 ¼ cup flour 

Because I make these so often, I have figured out what works and what doesn't. Feel free to use less butter because it tastes the same with about 2 tablespoons less. Also, I never try to pack all the flour in because then I feel like they get too floury. You may not find that's the case, but see what you think. You can always add more flour, but you cannot take it away. Start with my modification and the rest a little at a time; the dough shouldn't be too sticky or too shiny, or else it is difficult to roll into balls. 

Now, you can present the cookie in two ways:
1. Leave them as balls on the cookie sheet.
2. Press down on the balls with the spoon.


Leaving the Snickerdoodles as balls makes them softer and smaller. By pressing down with the spoon, they become flatter and crispier, which is how my family prefers their cookies:


Some people say that a cookie is a cookie and it does not matter if it's soft or crisp because they all taste the same. I disagree. Soft cookies and crisp cookies are two different experiences. Because this recipe makes about two dozen cookies, make one try with the round balls and then flatten the other one to see which one you like better. 

Either way, Snickerdoodles are a fabulous treat for lunch boxes, desserts, or holidays.

Happy Mother's Day, and enjoy the recipe!

Sunday, May 6, 2012

Applesauce Cake

Hello, all! I know I am a few days late with my post, and for that I apologize. However, I PROMISE I did bake on Thursday afternoon, and bake I did! I made my mother-in-law's Applesauce cake for my fiance. It is one of his favorites, and with his toothache, something soft enough he can chew without hurting. Because it is a family recipe of hers, I do not feel comfortable posting the recipe without her permission. Once I ask her and if she agrees, I will be more than happy to share it with all of you.

Here are some pictures of how it turned out:


The last image shows an awesome close up of the raisins, chopped apples and the walnuts I added to the batter. According to Joni's recipe, those three ingredients are not necessary, but it definitely adds flavor to the batter. While I am not the biggest raisin fan, Keith loves them, so I put them in. However, putting in the apples, raisins and walnuts made my batter so much BIGGER, that I had to make two cakes because the batter did not fit all in one pan. Next time, I think I am going to omit the chopped apples so I do not cut my finger while peeling. =/ Yes. I am not the safest person in the kitchen. 

This applesauce cake is moist and full of spice. It's perfect for breakfast, dessert or even a snack. Feel free to make it without the extras, or put your favorite ingredients in. The actual recipe calls for pecans, or you could even add cranberries if you like them. It's a delicious dish!

Monday, April 30, 2012

I.O.U

Hi Readers!

I sincerely apologize for not posting this past weekend; I always try to bake something one a week and blog about it on the weekend. Not because I feel an obligation, but because it is my outlet for stress. However, with all the projects, papers and assignments I have due for the end of the semester, my free time has seriously been lacking.

So here's my promise to you:


This Thursday, to celebrate the completion of my twelve page seminar paper, I will bake an Applesauce cake and blog about it. The recipe is my future mother-in-law's and it is my fiance's favorite. I've been dying to try making it own my own for the past week, but time just slipped away.

Next week, once finals are almost over, I plan on baking Snickerdoodles for my mother-in-law for Mother's Day. I'll probably do a double batch because there are one of my mom's favorites too.

So there's your schedule for the next two weeks. Give me some time to complete it, and you will not be disappointed!


Sunday, April 22, 2012

The Perfect Treat

I wish I had more time to blog and bake, everyone! Unfortunately, it is getting to be that time of the semester where time is scarce and there is just too much to do. Luckily, I did get to bake a treat this weekend. It is one of my absolute favorites because it combines the wondrous qualities of both brownie and chocolate chip cookie.

You guessed it: Caramel Chocolate Chip Brownies.

You should be able to read everything off there, but if you can't, please let me know, and I will manually post the recipe one day when I have more time.


Sometimes I like to tell you all about the substitutions I do to make the recipe a little healthier but taste just as good. THIS recipe, on the other hand. Is absolutely perfect as is. The only thing I do a little differently is change the amount of chocolate chips because my pan is a little smaller. If you are using a small pan, use about one cup of chocolate chips. 1.75 is just too much because it makes it too heavy and too chocolatey. However, if you are using a large pan, try using about 1.25 cups of chocolate chips instead. You really want to taste the brownie part of this treat, not just the chocolate.

What's great about this recipe is that you can substitute anything for the chocolate chips: walnuts, pecans, white chocolate chips, peanut butter chips, mint chocolate chips, or even butterscotch syrup instead of caramel. It's great because you could make it for several different occasions, but never make it the same way twice.

This is my "Finals Week Treat" to myself. Definitely try this recipe! It does NOT let you down.

Happy baking!

Sunday, April 15, 2012

Feel Better Cookies

Sorry it took me so long to post, all. I had a battle with sickness this past week and am finally feeling better!

Unfortunately, because of sickness, I did not get to bake anything. With throbbing sinuses and a fever, I did not think it was the best idea to consume anything I made with germy hands.

:[

LUCKILY, my fiancĂ© came to the rescue one night when I wanted cookies. Yes. Cookies. When I'm sick I want the weirdest things. Usually my go-to cookies are the Lorna Doone shortbreads I keep in the cabinet for times likes these. Unfortunately, they were stale. =/ Instead, Keith made me my absolute favorite cookies fresh out of the oven: chocolate chip!


They look SOOO good, right? Warm and chocolatey, melt-in-your-mouth. Magical. Rich. Fabulous. I could go on and on. The recipe Keith used to make me these wonderful masterpieces?

;D
Pillsbury's own secret goodness. Just preheat the oven to 350 F and set for about fifteen minutes! This is my one non-homemade indulgence I allow myself because I cannot get my chocolate chip cookies this heavenly. I do have a recipe a friend gave me to try because I was venting about how I hadn't found a chocolate chip cookie recipe I liked yet, but I was not going to have Keith try it when I was not around to supervise.

The other great thing about these cookies? Even your baking inept fiancĂ© can handle making them for you when you're out of commission. They are screw-up proof! 

I just wish I could have tasted them =/ Colds screw everything up!